Snowflake Backups To Amazon S3 Using Terraform
Snowflake offers multiple layers of native data recovery features such as Time Travel and Fail Safe, which allow querying data up to 90…
Contents
- Introduction
- Prerequisite setup
- Create an Amazon S3 bucket
- Create a storage integration
- Create an external stage
- Create a stored procedure
- Schedule stored procedure execution using tasks
- Recovery
- Conclusion
- References
Introduction
Snowflake offers multiple layers of native data recovery features such as Time Travel and Fail Safe, which allow querying data up to 90 days old and Snowflake’s team to recover historical data up to 7 days old, respectively. Time Travel also allows us to undrop tables in case we mistakenly drop a table, and we can configure database replication across regions.
Unloading data via Snowflake’s COPY INTO statement to an object store like Amazon S3 is yet another option to consider when implementing a Snowflake data recovery strategy. In this post, we demonstrate how to do just that using Terraform.
This post is inspired by Chris Herther’s How To Backup Snowflake Data to S3 or GCS, so if you are looking for a SQL-centric approach, I recommend you take a look at his post.
Prerequisite setup
Terraform provider configuration
The following code snippet shows the terraform provider configuration we are using to interact with Amazon Web Services and Snowflake.
The snowflake.sys_admin provider alias is mainly used to create snowflake resources, the snowflake.security_admin alias to issue GRANTs on those resources, and the snowflake.account_admin alias to perform account-level operations and other operations conveniently executable by the ACCOUNTADMIN snowflake role.
Furthermore, both the Snowflake and AWS terraform providers are additionally configured using environment variables as shown via the following script.
Once the above environment variables are populated, we can source the file and initialize terraform.source env.sh
terraform init
Basic snowflake environment setup
Before we configure and perform any kind of backup procedure, we need some Snowflake resources that are typically already defined in an organization. Using the terraform code that follows, we perform operations that lay the foundation off which we will configure backups to Amazon S3.
- CREATE a database named SANDBOX
- CREATE a schema named ACTIVITY
- CREATE tables named USERS and EVENTS
- CREATE a role named SANDBOX_RW for performing read-write operations in the SANDBOX database
- CREATE a virtual warehouse
- Apply appropriate GRANTs to each resource
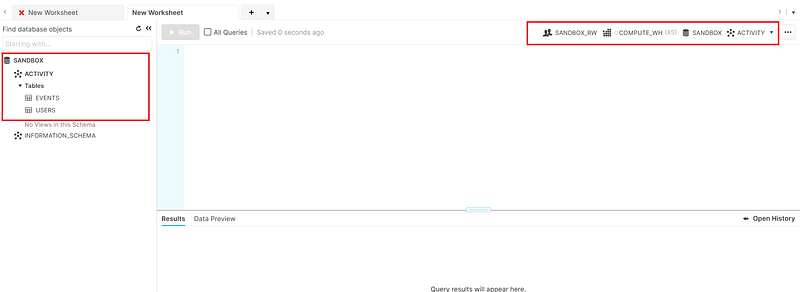
After applying the above terraform code, the highlighted resources in the image below should be visible, usable, and queryable in the Snowflake web console.
Run the following statement to add a bit of data to the USERS table so that we will have something to backup. We only insert records into the USERS table to later demonstrate that the COPY INTO <location> FROM <table> statement does not unload empty tables like our EVENTS table.
INSERT INTO sandbox.activity.users VALUES ('1', 'Jenkins');Create an Amazon S3 bucket
We will need some place to store the database backup files, and an object store like Amazon S3 is a cheap enough and reasonable place to store them.
In the code above, we create an Amazon S3 bucket. We also ensure that versioning is enabled, week old files are transitioned to cheap Amazon Glacier storage, and 30-day-old files are expired. Consider your own versioning, transition, and expiration policies and make the necessary adjustments.
Next, we create a Snowflake storage integration and external stage to access Amazon S3.
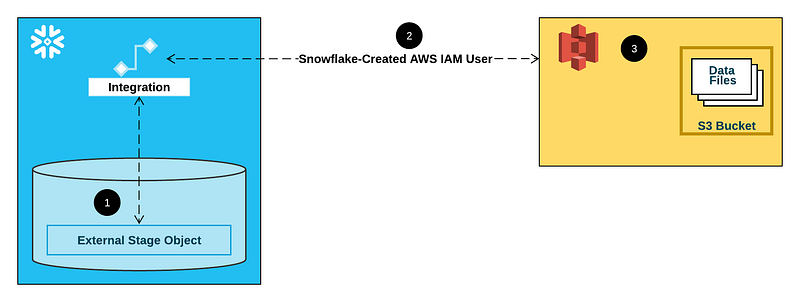
Create a storage integration
The terraform code that follows creates and configures an IAM role with sufficient permissions for Snowflake to interact with the S3 bucket we created.
It also creates a TOOLS schema in the SANDBOX database that will house Snowflake resources such as storage integrations, stored procedures, and tasks as you will see later on.
Inspect the created storage integration
DESCRIBE INTEGRATION SNOWFLAKE_S3_BACKUP;Create an external stage
Here we create an external stage connected to our S3 bucket via the storage integration. The files in the stage will be GZIP compressed CSV files.
Inspect the created stage
DESCRIBE STAGE SANDBOX.TOOLS.SNOWFLAKE_S3_BACKUP;Create a stored procedure
The body of the stored procedure is written in JavaScript as shown below.
There are a few things to note about this stored procedure.
- The capitalization of the
DATABASEprocedure parameter is required. - Only base tables are unloaded.
- Unloaded tables are split into one or more files matching the
data_.*[.]csv.gzpattern, each of which are at most 100 MB in size per Snowflake’s File Sizing Recommendations. - Unloaded files contain a header row and are overwritten each time the procedure is executed if the procedure is executed multiple times in a day.
- The
COPY INTOstatement does not unload any data for empty tables.
Inspect the created stored procedure
DESCRIBE PROCEDURE SANDBOX.TOOLS.SPROC_BACKUP_DATABASE(VARCHAR);Test the created stored procedure
CALL SANDBOX.TOOLS.SPROC_BACKUP_DATABSE('SANDBOX');You will know that the stored procedure works if you find the relevant files in the S3 bucket. In this case, there should be files located in S3 that match the following pattern.
s3://<bucket>/<YYYY-MM-DD>/<db>/<schema>/<table>/data.*[.]csv.gzSchedule stored procedure execution using tasks
Here we create a TASKADMIN role for managing and operating tasks, a task that calls the stored procedure we created with the SANDBOX database as a parameter on a cron schedule, and update exiting GRANTs to include the TASKADMIN role.
The code is effectively a terraform translation of the SQL found on Snowflake’s Introduction to Tasks — Creating a Task Administrator Role documentation page.
Inspect the created task
USE ROLE TASKADMIN;
DESCRIBE TASK SANDBOX.TOOLS.TASK_CALL_SPROC_BACKUP_DATABASE;
View a history of task execution
The account usage TASK_HISTORY view allows us to view the history of task executions.
USE ROLE ACCOUNTADMIN;

SELECT *
FROM snowflake.account_usage.task_history
ORDER BY completed_time DESC
LIMIT 10;
It would have been nice to have the ability to manually trigger a task to test that it is configured correctly, but there’s no way to do that (at the time of writing). One workaround is to adjust the specified cron schedule to run the task every minute and review the TASK_HISTORY view and the resulting backup files in S3.
⚠️ If you use this workaround, remember to readjust the cron schedule to something more reasonable to avoid unwanted Snowflake credit usage.
Recovery
We can view the backup files available in our stage — i.e., in the S3 bucket — using the LIST statement. Notice that there aren’t any files for the empty EVENTS table as previously alluded to.
LIST @SANDBOX.TOOLS.SNOWFLAKE_S3_BACKUP;
Here we see that there are backups of the USERS table for 2022–01–14 and 2022–01–15. Let’s query the data in the latest backup.

We can then create a table to store and inspect the recovered data more closely using a CTAS statement.
CREATE TABLE sandbox.activity.users_recovered AS
SELECT
  $1 as ID
, $2 as NAME
FROM @SANDBOX.TOOLS.SNOWFLAKE_S3_BACKUP/2022-01-15/SANDBOX/ACTIVITY/USERS;
Having to specify an alias for each column may be tedious for wider tables, so there is a two-step approach we can use that includes a CTL and INSERT statement.
CREATE TABLE sandbox.activity.users_recovered LIKE sandbox.activity.users;
INSERT INTO sandbox.activity.users_recovered
SELECT $1, $2
FROM @SANDBOX.TOOLS.SNOWFLAKE_S3_BACKUP/2022-01-15/SANDBOX/ACTIVITY/USERS;
Once we have inspected the recovered table to ensure that things are as expected, we can replace the original table with the recovered table.
ALTER TABLE sandbox.activity.users RENAME TO sandbox.activity.users_old;
ALTER TABLE sandbox.activity.users_recovered RENAME TO sandbox.activity.users;
DROP TABLE sandbox.activity.users_old;
Conclusion
Some teams have opted to manage a portion of their Snowflake environment via infrastructure-as-code tools such as Terraform. Such a decision may lead to data recovery solutions similar to the one presented in this post.
However, this method has some limitations such as not accurately reflecting the full database in the backup files since empty tables are not unloaded. (Although, there is a workaround for this should you want to have an unloaded file with only headers for empty tables.)
It’s also reasonable to expect that you may want to exclude certain schema or particular tables from being unloaded. While the solution presented in this post does not allow for this, you can further parametrize and modify the backup stored procedure to add this functionality.
Additionally, because the Snowflake API for stored procedures is synchronous, an executing query must be completed before another can begin. This means the stored procedure used in this post may be sufficient for backing up a database with relatively small tables while backing up databases with large tables may consume significantly more compute credits than is desirable. A more production-ready solution would involve writing client code that uses a Snowflake connector to run the COPY INTO queries asynchronously so that they are executed in parallel.
Finally, restoring data from backups may not be as straightforward as presented here as there may be schema changes between when a backup was created and the time of recovery. Schema information such as what’s found in the information_schema.columns in each database may be helpful to understand the differences in schema between the backups and current tables. The stored procedure can be modified to unload a database’s information_schema.columns table alongside the other tables in the database as well.
You may view the complete source code used in this post on GitHub.
References
- Artin Avares. Snowflake. Snowflake Introduces JavaScript Stored Procedures
- Claus Herther. How to Backup Snowflake Data to S3 or GCS
- Managing Snowflake Architecture with Terraform and dbt, Ritual
- Snowflake. Create Storage Integration
- Snowflake. Create Table
- Snowflake. Working with Stored Procedures in JavaScript
- Snowflake. Connectors and Drivers
- Snowflake. Database Replication
- Snowflake. Data Unload S3
- Snowflake. File Sizing Best Practices and Limitations
- Snowflake. Introduction to Tasks — Creating a Task Administrator Role
- Snowflake. Option 1: Configuring a Snowflake Storage Integration to Access Amazon S3
- Snowflake. TASK_HISTORY View
- Snowflake. Undrop Table